April 2025 Part 1
SOKO NJ-
Link to Website Index: ![]()
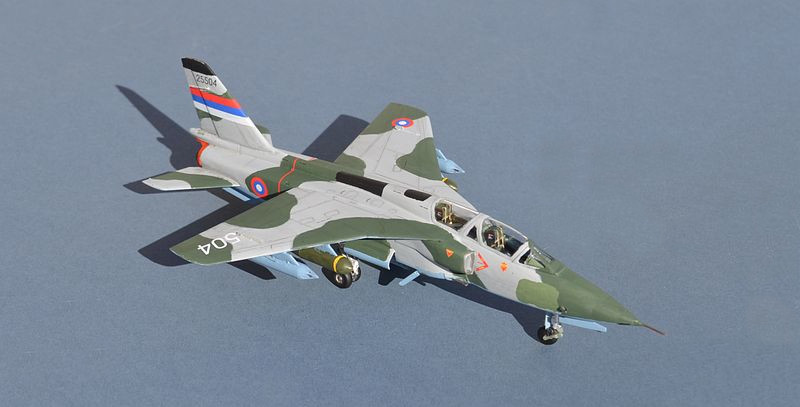
SOKO NJ-
Republika Srpska Air Force (V I PVO VRS) -
Banja Luka (Mahovljani Air Base), Former Yugoslavia, 1992
Litaki 1/72
Link to Website Index: ![]()
The SOKO Orao was another indigenous Yugoslav design from the late 1970s/early 1980s.
Developed as a joint Yugoslav-
With an airframe configuration that is very reminiscent of the Anglo-
Originally built in Mostar, Bosnia Herzegovina, the SOKO factory was destroyed early in the Yugoslav wars, with plant being stripped by the withdrawing Yugoslav Army (JNA) and moved to the UTVA aircraft company in Pancevo, North East Serbia (a factory that was later destroyed by NATO bombing).
During the 1990s Yugoslav Wars, JNA aircraft conducted a number of attack sorties
against Croatia early in the war before mostly withdrawing to Serbia-
J-
A shortage of spare and fuel due to UN Blockades quickly reduced the availability of these aircraft and NATO’s Operation Deny Flight all but grounded them, although a few flights continued until the mid 1990s. After the war, the aircraft were absorbed into the combined Bosnia–Herzegovina Air Force but placed in storage, with some reportedly eventually sold to Serbia. Some further operations by Oraos took place during the Kosovo Wars and a large number of the remaining aircraft were destroyed by NATO bombing of Podgorica in 1999. Despite this, the modern Serbian Air Force continues to operate around 17 of the type, and these are expected to be modernised and continue in service for some time to come.
Building the Litaki NJ-
As the second part of my Yugoslav Wars project, this is the new (2024) Litaki kit of the SOKO NJ22 Orao light attack aircraft.
Litaki are a Ukrainian company that have issued 2 Orao kits, one of the single seater and this 2 seat variant, which I think it looks a more balanced design because of its longer nose.
 The kit was definitely not cheap but I managed to get one at a good discount from
Oxonians Plastic (as a Christmas present). Despite the high cost the quality of
the kit is very impressive, with precise and delicate moulding, inclusion of photo
etch details and painting masks, lots of relevant ordnance to hang under the wings,
plus what seems like a small detail but is one I really applaud, a box sized high
quality print of the superb original box art by Carlos Alonso.
The kit was definitely not cheap but I managed to get one at a good discount from
Oxonians Plastic (as a Christmas present). Despite the high cost the quality of
the kit is very impressive, with precise and delicate moulding, inclusion of photo
etch details and painting masks, lots of relevant ordnance to hang under the wings,
plus what seems like a small detail but is one I really applaud, a box sized high
quality print of the superb original box art by Carlos Alonso.
As with my previous build of the Super Galeb, the kit comes with a very wide choice
of aircraft markings, from pre-
The kit is moulded on very compact and busy sprues, reminiscent of ICM but I would suggest of higher quality in terms of detail and lack of flash. Because everything is so small and close together, some of the sprue attachments are a little difficult to separate, but everything about this kit shouts “quality” from the exterior of the box to the full colour instructions. The copious photo etch dictates that some of the assembly needs to be carefully thought out to allow painting and then application of the etch; this is not a kit for a blitz build and it will require some time and patience. I found that the brass photo etch was not easily attached with CA glue, particularly the cockpit parts – possibly it needed some more cleaning before doing so.
Background Image -
Each of the well detailed ejector seats is made up from 5 plastic parts and an additional 7 photoetched parts. The main cockpit area is a neat and precise assembly, but beware as its clever design needs to fit together exactly for the various parts to end up in their correct position and orientation. They do (very well in fact), but it's not immediately obvious from the instructions in what order they should be assembled. Partly because of this, I did have some issues fitting the rear instrument panel into place that required a little brute force.
The undercarriage bays are also multi part assemblies, again a little vague in the order of assembly, but a very precise fit once in the right place. The fuselage is split horizontally, which can sometimes cause problems for aligning long seams and indeed this was my first real problem with this kit. Despite careful positioning and judicious clamping, the upper and lower fuselage parts did not fit together well, leaving a significant ledge along most of the seam.
Fortunately the shape of the fuselage and the construction sequence allow some heavy duty sanding without destroying to much detail. The sanding will need to be repeated once the air intakes are added as these are a reasonable fit but will need tidying up. The wings are likewise not a good fit to the fuselage and although they look OK from above, I was left with a large and awkward gap beneath that had to be filled. The tailplanes are attached via some interesting rhomboid inserts, the purpose of which is not clear to me. The individual tailplanes are attached by tabs, which are nice and secure, but make it difficult to place the tailplanes in anything other than horizontal position (all of my reference photos showed a small but noticeable droop when parked).
The undercarriage is without doubt the most difficult part of the entire build. The
main gear legs are each built up from 7 separate parts (plus wheels). These are
nicely moulded and detailed, but proved almost impossible to align correctly and
if you pre-
The kit is clearly a tail sitter, so I added some lead shot into the nose space through
the gap left before the cockpit coaming is attached and fixed it with some runny
Gorilla Glue. It actually required a lot less weight than I expected, which is useful
because the undercarriage structure is quite fragile, with a delicate multi-
Litaki have provided a good selection of underwing stores, including two types of
unguided rockets, two UK supplied BL-
As with my Super Galeb, I used some generic paint colours to reflect the faded nature
of the real aircraft. The upperside is Humbrol 127 and 30. For the underside I
mixed up a suitable blue shade from Revell aircraft blue and Humbrol dark blue. Decals
performed very well, being thin, with good colour density and easy to move in place
once applied. The tail banner, which was a difficult fit on last month’s Super Galeb,
was a perfect fit on this kit. Reference pictures of Serbian aircraft tend to show
them heavily weathered with multiple shades of green and grey, however the few pictures
of Bosnian Serb aircraft show them as almost pristine, bar the overpainting of the
white nose side numbers in a different green. They are also a much lighter grey,
reminiscent of pre-
In conclusion, this is a lovely little kit of an unusual aircraft, but it is definitely not one for the beginner. Indeed, I would suggest this is only one for the experienced and patient modeller with good handling skills and eyesight! It is certainly expensive, but comprehensive and beautifully packaged and it is obvious that the mould designer has put a lot of effort and care into getting the details right.


Link to other Yugoslav models on my “Other Side” pages