March
2009
![]()
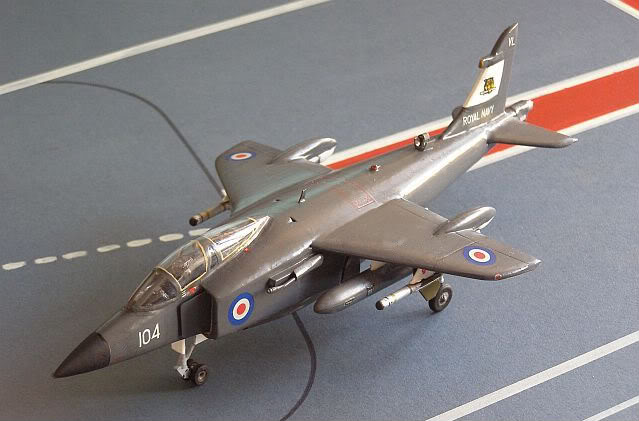
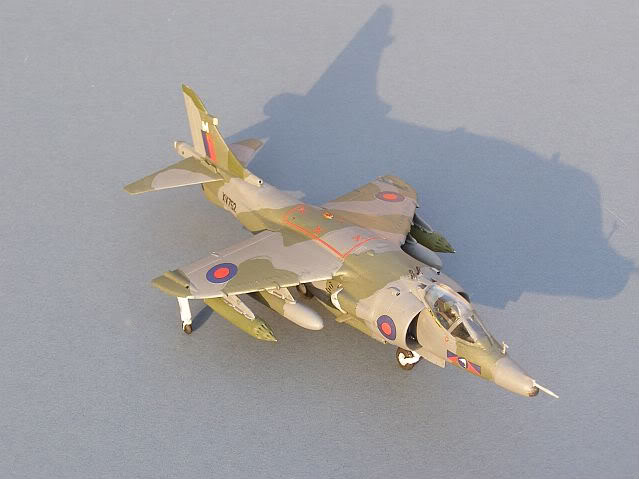
Hawker P.1154 RN Osprey. 804 Sqn Fleet Air Arm, HMS HERMES, 1981.
Project X Vacform, with decals from various sources.
This is one of the gems of my stash; bought some time ago, but left unbuilt because I wasn't sure I could do it justice. Undoubtedly an all-singing-all-dancing resin version will appear shortly, so best I build it before it becomes obsolete!
The P.1154 was Hawker's original proposal for an in-service aircraft developed from the P.1127. With the more powerful Bristol BS.100 engine and plenum chamber burning, it was expected to be supersonic, whilst a full size AI radar and BVR missiles would have given it a weapons capability similar to the Phantom. Predictably, it was not to be; trying to build a single seat ground attack aircraft for the RAF and a two seater Fleet fighter for the RN using the same airframe, was always an unrealistic target.
Instead, a cut price operational version of the P.1127 research aircraft became the first generation RAF Harrier that we all know, while the RN received the excellent F-4K Phantom instead (which it had wanted all-along) and had to wait some time longer before it got its own radar equipped Sea Harrier fighters.
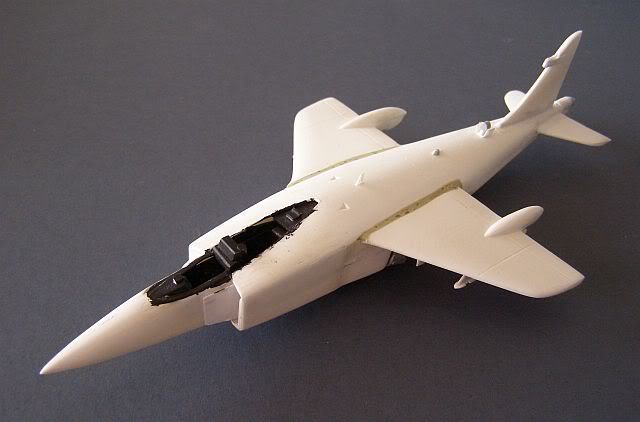
Vacforms seem a bit old fashioned and clunky nowadays - resin is so much easier. Nevertheless, Maintrack Model's "Project X" series are some of the best examples of this disappearing modelling genre. Formed on a single sheet of plastic card, the kit comes with a bag of nicely formed white metal parts, including undercarriage, jet nozzles and ejector seats.
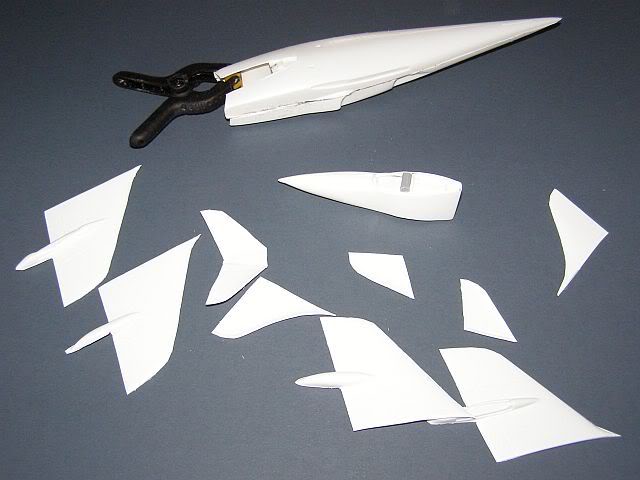
Removing the parts from the sheet. The approved method is to use a Stanley knife, but I find that sharp scissors are a better bet. Draw a thin line around the base of each part as a cutting guide:
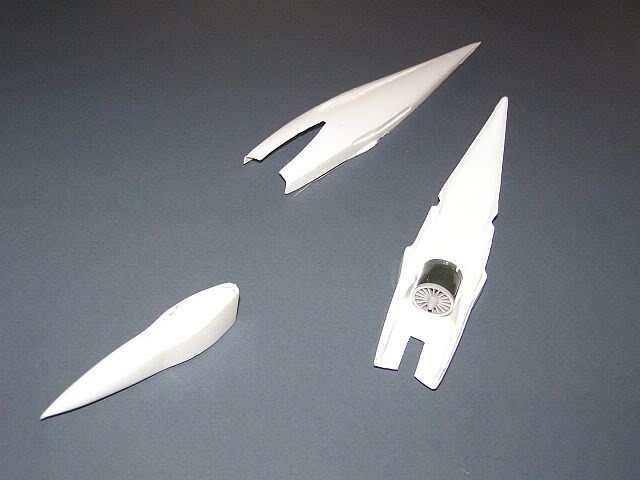
Main fuselage parts assembled. You can't actually see the engine once it is all together, but I know its there! The bulkheads didn't fit well and seem a bit superfluous in any event. I fitted small lips on the lower fuselage to assist in alignment and to provide a back for any subsequent filler. Some of the parts are much more sharply formed than others; the internal intake walls being a good example, with one side sharply formed and the other a bit like a jelly mould!
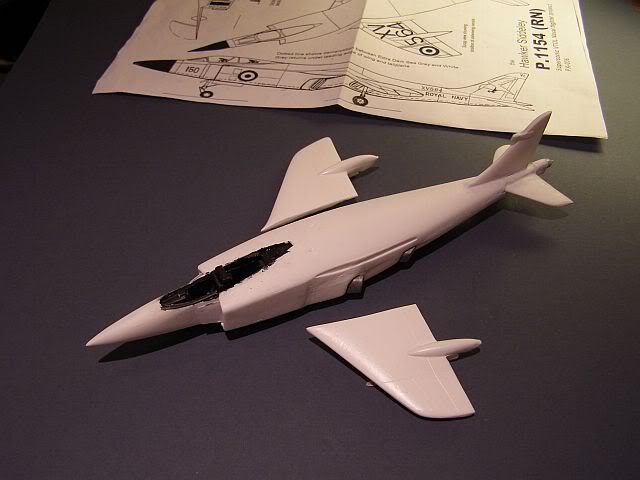
I have fitted a few additional bits and bobs - an RWR fairing on the fwd fin (as per Sea Harrier), and a similar shaped bit on the rear of the fuselage. I have also used some spare parts to give me weapons pylons on the wings and fuselage. That large slab side to the intakes proved difficult to get a clean seam/join, so I have added and faired in a flat bit of plastic card (ice cream box lid FWIW) which looks much better. The wings and tailplanes aren't too bad, but are too thick at their tips. I don't want to sand any more off, so will live with them.

Next up, attaching the wings. The kit comes with a "spar", but I am going for a simple butt-joint, careful positioning and fast setting glue!
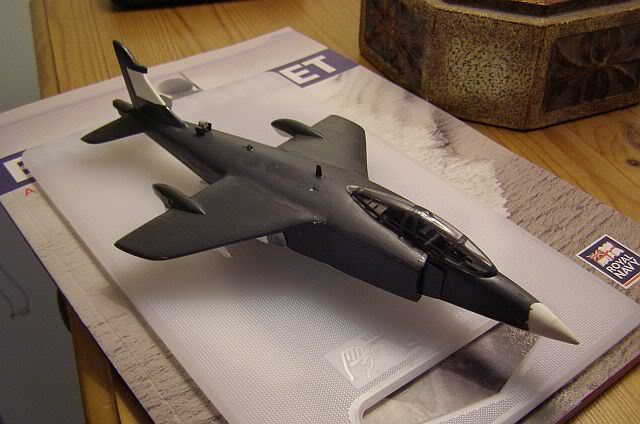
One of the problems with vacforms is that they can look a bit bare, so I have added a few surface details to liven the fuselage up: a couple of blade aerials, a nav/anti-collision beacon and a scratch built ram-air generator in its extended position. Mrs T has kindly sourced another bottle of Tippex today for me to use as filler, so on we go.
Fuselage is largely there (standfast undercarriage), so I will attach the wings tonight; suspect some Milliput may be needed to fill the gaps. There is an aligning tab/spar provided on the sheet, but I think simple but joints and clamps will be better in the long run.
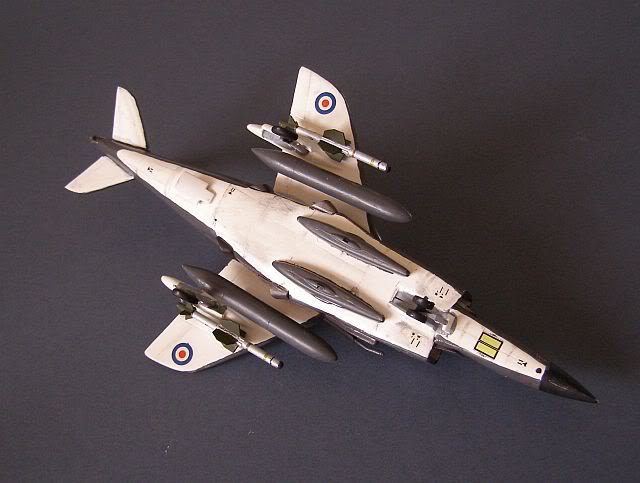
Drop tanks (ex Matchbox Hunter) and Red Tops (ex-Frog Sea Vixen) are ready to be attached after wing painting. Canopy is trimmed down, but still looks a bit bulbous to me. We shall see after I have painted on the frames.
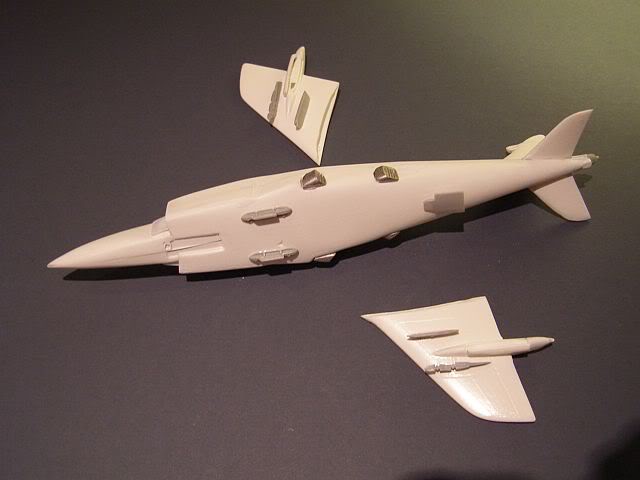
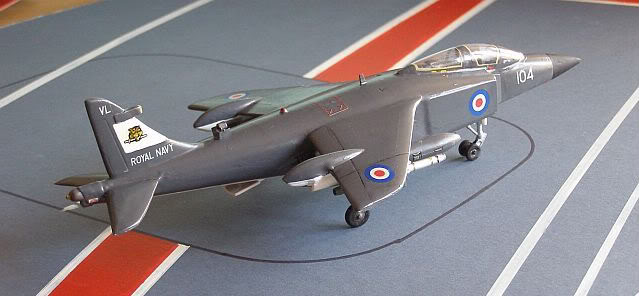
Slow but steady progress. Like the SHAR, fuel would have been an issue, so an extending refuelling probe has been attached to the port side of the fuselage. I have decided to go with 25mm Aden Gun pods in the lower fuselage, rather than the full 4xRed Top outload I had planned. The rather nice white metal ejector seats are also receiving some attention tonight.
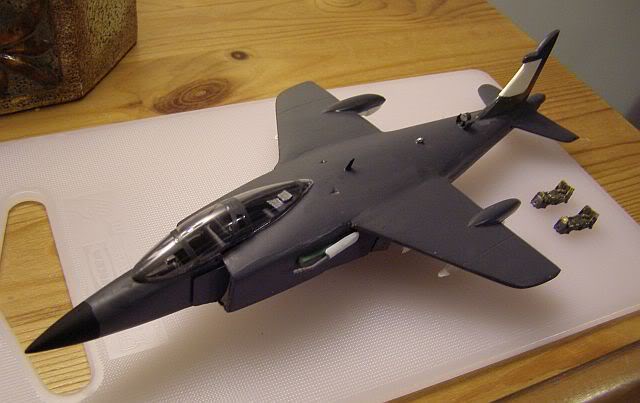
Its been a busy week, so comparatively little progress, but as you can see, the cockpit is now finished and canopy attached, she is now standing on her own spindly legs, has the drop tanks attached and various small details have been addressed. You can't see it in this shot, but she also has the Aden gun pods attached underneath. The wheels and Red Tops need a little more attention, but I hope to begin decalling this weekend.
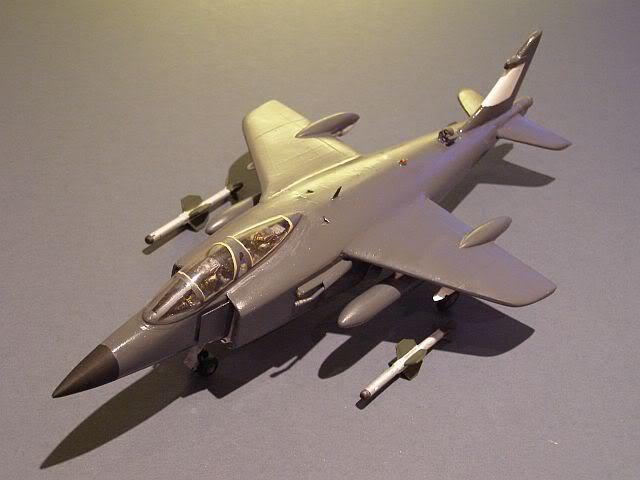
And finally, the finished pictures:
More pictures on the What-If & Research Pages
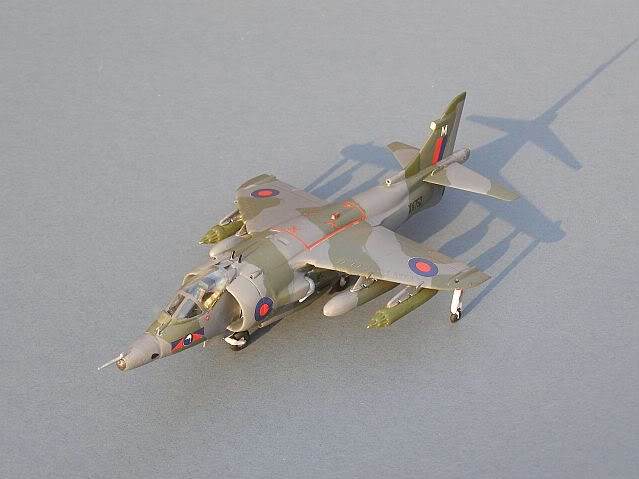
British Aerospace Harrier GR.3 - 1417 Flight, Royal Air Force Belize, 1987.
Fujimi, out the box.
Considering my general enthusiasm for Harriers, I am strangely lacking (built) models of the RAF's first generation aircraft (although there are 4 in the stash!).
As a result, this month's second build, continuing the VSTOL theme, will be one of 1417 Flt's aircraft from RAF Belize in the mid 1980s. Whilst I was serving in HMS LIVERPOOL, during our 1987 "West Indies Guardship" deployment (its a dirty job, but someone has to do it!), we exercised with 1417 Flt off the coast of Belize, providing our splash target for them to practice attacking fast moving sea-borne targets with Aden Guns and Rockets. Our activities attracted much interest from heavily armed (and not altogether friendly) Honduran and Guatemalan gunboats, which added a little spice to the proceedings.
Fujimi's kit looks nice in the box, and fit is generally very good. Unfortunately, the method chosen to allow the land based Harrier & Sea Harrier to be made from the same mould is far less clever than either the ESCI/Italeri/Airfix or Hasegawa kits. As a result, the Fujimi kit has an awkward and unnecessary butt joint between main fuselage and cockpit (without even any fitting lips/guides) that really spoils the kit and which I suspect could defeat the less experienced modeller. As with the ESCI/Italeri/Airfix kit, its ejector seat is wrong for a UK Harrier, so I have done a few scratch mods.

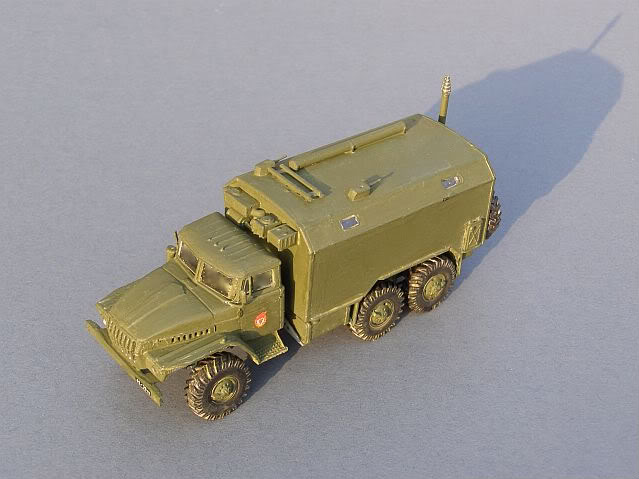
Making progress - in the foreground you can see my third build of the month - a Urals 43203 Truck
See those 2 fiddly little aerials behind the canopy? - in all my Harrier builds I have still not yet managed to do a set of these that I am happy with - aaaaargh!
There is something not entirely right about the look of the intakes, which don't have the same cut-back angle of other Harrier kits. The canopy also looks very "square" to me and doesn't have the distinctive explosive cord in the canopy. It does have open "vents" at the rear, which are wrong. The upper fuselage anti-collision beacon is missing altogether, so this was fabricated using some spare sprue.
The decals are actually quite nice, and settled very quickly under a light coat of Decalfix. I am not entirely sure about the nose flashes though - all of my reference pictures (which admittedly are later) show the blue and red colours reversed, with a much smaller fish in the middle on a red background. I may have put them on upside down, of course (the instructions are very unclear), but I think the fish is the right way up.
That said, it can definitely be made into a good model, but it requires particular care and effort. It's not cheap either, although mine all came from e-bay!
Urals 43203 Truck with Command Post body, Soviet Army Guards, 1985.
ICM, out the box.
This one piqued my interest whilst browsing the shelves of my local model shop and as it was cheap (£5.99), I bought it! I love the brutish look of this enormous vehicle; apparently the Urals 4320 is the current "standard" large truck in Russia. Its excellent ground clearance and powerful V8 or V6 Diesel engines mean that it has seen widespread use in the Russian (and associated) military since the early 1980s.
Ukrainian company ICM have produced a superbly detailed and engineered 1/72 model, which was great fun to build, and is available in a range of body styles - this one is the Command Vehicle version, but fuel tankers and other general purpose versions are also available; based on my experience with this one, they are highly recommended !
www.gengriz.co.uk